Craft Visually Stunning Strawberry Santas in Easy Steps
As the festive season approaches, the kitchen often becomes the heart of holiday preparations, filled with the aroma of spices and the gentle hum of excited conversation. But what if you could create a dessert that embodies all the joy and visual charm of the holidays without the typical stress of baking? Enter strawberry santas – an enchanting, no-bake treat that effortlessly brings cheer to any table. These delightful little figures combine the vibrant sweetness of ripe strawberries with the creamy indulgence of frosting, making them an instant favorite for both children and adults. They are not just adorable; they're incredibly simple to assemble, offering a perfect opportunity for creative expression and shared moments in the kitchen. Whether you're looking for a quick party platter addition or a delightful project to undertake with little helpers, Quick & Easy No-Bake Strawberry Santas for Holiday Fun are your answer to a festive, fuss-free dessert.
Why Strawberry Santas Are the Ultimate Holiday Treat
The appeal of strawberry santas extends far beyond their charming appearance. They offer a unique blend of practicality, health benefits, and sheer delight that makes them stand out among traditional holiday confections:
- Effortless Preparation: Forget the oven, timers, and complex techniques. This recipe requires no baking whatsoever, making it accessible to even novice cooks. It's the kind of project where hands can move slower, more intentionally, allowing for a relaxed, enjoyable experience.
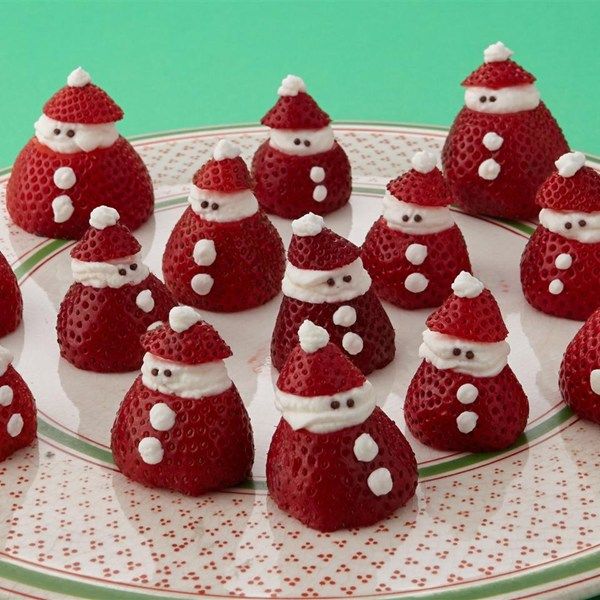
- Irresistible Visual Appeal: With their bright red "suits" and fluffy white "beards," these tiny Santas are miniature works of art. They instantly brighten up any dessert spread and make for fantastic festive centerpieces or edible gifts. They certainly create "small wins that look festive without demanding much back."
- Kid-Friendly Fun: From washing strawberries to piping frosting and adding chocolate chip eyes, every step of making strawberry santas is engaging for children. It's a fantastic way to involve them in holiday preparations, fostering creativity and a sense of accomplishment. The kitchen smells clean and sweet, creating a delightful atmosphere where "sticky fingers reaching in too early" are part of the fun.
- A Guilt-Free Indulgence: Compared to many sugar-laden holiday desserts, strawberry santas offer a lighter, fresher alternative. Packed with vitamins from the fresh fruit and a modest amount of creamy frosting, they allow for a sweet treat that feels less indulgent. For more on this, check out Adorably Simple Strawberry Santas: A Guilt-Free Holiday Treat.
- Creates Cherished Memories: The process itself is as rewarding as the final product. It’s a recipe that creates space for conversation, laughter, and that "quiet joy that only shows up when things are allowed to stay easy."
Gather Your Ingredients: The Heart of Your Strawberry Santas
One of the beauties of this recipe lies in its simplicity and minimal ingredient list. You likely have most of these items already, or they are readily available at any grocery store. For truly spectacular strawberry santas, ingredient quality is key.
- Fresh Strawberries: Aim for ripe, firm strawberries with vibrant red color. Medium to large berries work best, as they provide a good "body" for your Santa and are easier to handle. Ensure they are washed thoroughly and, crucially, completely dry before assembly.
- Mascarpone Cheese: This Italian cream cheese is the secret to a rich, stable, and luxurious frosting. Its slightly sweet, tangy profile pairs wonderfully with strawberries. Ensure it's cold when you start.
- Powdered Sugar (Confectioners' Sugar): Essential for sweetening the mascarpone and giving the frosting its smooth, pipeable consistency.
- Vanilla Extract: A splash of good quality vanilla extract enhances the flavor of the frosting, adding a warm, comforting note.
- Mini Chocolate Chips: These tiny morsels are perfect for Santa's eyes, adding a touch of personality to each creation.
- Optional Embellishments: Consider a dusting of extra powdered sugar for a "snowy" effect, or tiny edible silver pearls for buttons on Santa's suit.
Pro Tip: While the recipe focuses on a mascarpone frosting for stability and richness, a simple whipped cream (heavy cream, powdered sugar, vanilla, beaten until stiff peaks) can also be used for an even lighter option, though it might be less stable at room temperature for extended periods.
Crafting Your Adorable Strawberry Santas: A Step-by-Step Guide
The true magic of strawberry santas unfolds in the assembly. This process is intuitive and fun, making it perfect for involving family members of all ages. No oven is involved, no timers going off – just pure, playful creation.
1. Prepare the Luscious Mascarpone Frosting
First, we create the creamy "beard" and "hat pom-pom" for our Santas. In a medium bowl, combine the chilled mascarpone cheese and vanilla extract. Using an electric hand mixer, beat them together until smooth. Gradually add the powdered sugar, beating until the mixture is thick, smooth, and holds its shape well. The consistency should be firm enough to pipe without losing its form. Once ready, transfer the frosting to a piping bag fitted with a small star piping tip. This allows for that classic, fluffy whipped cream look.
2. Prepare Your Strawberries for Transformation
Wash your strawberries gently under cool water and pat them thoroughly dry with paper towels. This step is critical, as any moisture will make it difficult for the frosting to adhere. Using a small, sharp paring knife, carefully slice off the green leaf-end of each strawberry to create a flat, stable base. This ensures your Santas stand upright. Next, cut a ½ to ¾-inch piece from the pointed tip of each strawberry – these will become Santa's iconic hats. Arrange the main strawberry bodies, wide-side down, on your work surface or serving platter.
3. Assemble Your Charming Strawberry Santas
Now for the fun part! Take your piping bag and pipe a generous swirl of frosting (about ¾-inch high) onto the flat base of each strawberry body. This forms Santa's beard and the main part of his suit. Gently place the reserved strawberry "hats" on top of the frosting swirl, slightly tilted if you like, just like a jaunty Santa hat. Finally, pipe a small dollop or ball of frosting on the very tip of each strawberry hat to create the quintessential pom-pom. For the eyes, carefully press two mini chocolate chips, pointed-sides inward, into the frosting swirl below the hat. Some prefer to use tiny dots of gel icing for a softer look, but chocolate chips offer wonderful texture and contrast.
4. Creative Touches & Serving Suggestions
Don't be afraid to add your personal touch! A light dusting of powdered sugar over the finished Santas gives them a freshly fallen snow effect. For extra sparkle, you could add edible glitter. Arrange your finished strawberry santas on a large platter, perhaps interspersed with fresh mint leaves for a pop of green, or line them up soldier-style on a festive cake stand. They are best served fresh but can be refrigerated for a few hours before serving. Just ensure they are covered to prevent them from drying out or absorbing refrigerator odors. The joyful sight of these playful treats is sure to bring smiles all around.
Tips for Perfect Strawberry Santas Every Time
Achieving picture-perfect strawberry santas is easy, especially with a few insider tricks:
- Uniformity Matters: Try to select strawberries of similar size for a cohesive look on your platter. This also makes them easier to cut and assemble consistently.
- Chill Everything: Ensure your mascarpone and even your piping bag are well-chilled before you start. Cold ingredients contribute to a firmer, more stable frosting that pipes beautifully.
- Practice Your Pipe: If you're new to piping, do a few test swirls on a plate before moving to the strawberries. This helps you get a feel for the pressure and motion needed to create consistent frosting swirls.
- Secure the Hat: When placing the strawberry hat, give it a gentle press to ensure it adheres well to the frosting and doesn't slide off.
- Embrace Imperfection: Remember, homemade treats have character! If a Santa looks a little quirky, it only adds to its charm. The goal is to have fun and create something festive and delicious.
Making strawberry santas is more than just following a recipe; it's about embracing the festive spirit, enjoying the creative process, and sharing a little bit of homemade joy. With their vibrant colors, delightful flavors, and incredibly easy preparation, these charming treats are guaranteed to be a highlight of your holiday celebrations. So, gather your loved ones, roll up your sleeves, and get ready to craft some visually stunning, utterly delicious strawberry Santas that will leave everyone amazed and delighted.
